Introduction:

While the last article was “Get Started With Test Driven Development: Unit Testing With PHPUnit?. ”, this article will help to beginning with Travis, which make joint effort with your group.
Travis CI is a computerisation tool which permits group to submit and construct venture without any problem. When you have arranged your GITHUB project, at whatever point there is new commit, Travis CI will synchronise code from GITHUB repository and start the build process. This way developer don't need to worry about running PHPUnit every time. Travis builds & deploy your software rapidly. Personally like Travis CI as a automatic build tool as it is easy to integrate with GITHUB, it has a clean UI, a lot of highlights while beginning with other automation tool is tricky.
Travis CI supports multiple programming languages, you just need to define in your .travis.yml file (in root directory of the project) that which language project written and remaining Travis will take care. I will not be able to explain all language and environment they support, you can find from their documentation. Today we gonna write about “How to integrate Travis CI (continuous integration) automation tool for a PHP project on GITHUB repository.”
Get Started With Travis CI:
Below are neat steps for Integrating Travis CI in your GITHUB projects.
Step1: Travis UI- Sign in:
Sign in into Travis CI Tool using your GITHUB account.

Step2: Travis Setup- Activating for the repository:
Setting up Travis is very simple and straight forward. Once you logged into Travis, go to profile page and you can see your entire GITHUB repositories already synchronised and displaying into the page. Choose which repository you want to build, activate/deactivate it using simple “on”/“off” button as below screenshot.

If you have created a new repository into GITHUB under the same account and it is not displaying into Travis profile page, then simply click on “Sync” button as highlighted in above screenshot. Once you activate Travis for your repository every time you commit into the repository Travis will trigger build process.
Step3: Travis Aware- Add a .travis.yml file into your Repository
Different project will different environment setup. To inform Travis CI under what environment you require to build and test your project, you need to add a configuration file named .travis.yml in root directory of your GITHUB project. Below sample example,

Above .travis.yml configuration file informs Travis that it is PHP based project, Travis should run tests against 4 different versions of PHP as well as in HVVM. It also tells that project will accept failure in PHP v7.0, before build it should update the composer version. It will run all our tests suits located into tests directory.
By default on every Build Failure Travis will notify you via email. However you can stop notification by changing the notification flag as "false" as above screenshot.
To verify yml config file use http://lint.travis-ci.org/.
A great way to learn about .travis.yml is browse through various open source projects in GITHUB repositories that are uses Travis CI for build process. Here some example below,
Step4: Adding Travis CI Service into GITHUB:
Goto your Travis profile page by clicking Account, find token left hand side. This token will be used to identify your github project by Travis CI. See screenshot below,

Copy the token and while adding a service paste into the box, goto your repository settings, under “Webhooks & Services”. sample screenshot below to find location.

Step5: Travis Build- Triggering Build Process:
Now Travis is ready to build our awesome project, every time we push into GITHUB repository Travis will start building the project. You can see the build process or status in your travis page, under your githubu-username/repository-name. For example below.
https://travis-ci.org/cygnite/framework
See the build status on same page. You can see below screenshot as all tests passes for Cygnite it shows green, else it will display as red.
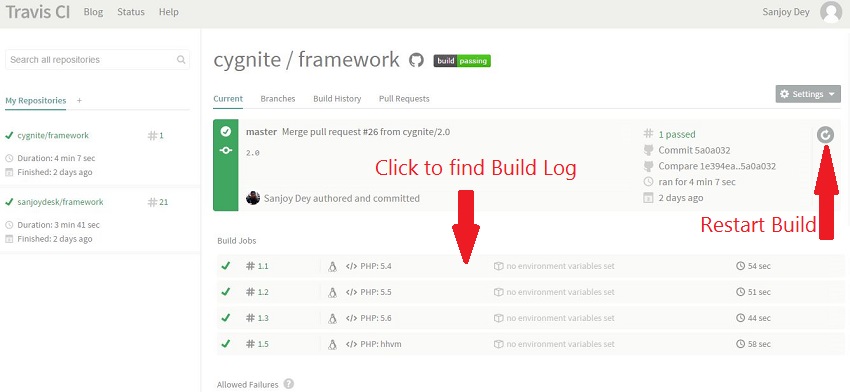
You can manually restart the build by clicking a button as above screenshot.
Build History:
Click on Build history tab to see history of builds it processed. Sample screenshot below.

Learn More:
You can find more information about Travis configuration in their official documentation. Some useful links below,
Wrapping Up:
I believe I gave you very good introduction of Travis CI Integration with GITHUB projects. It is really very easy to use. As popular dependency manager composer for PHP, Travis CI is also becoming favorite Continuous Integration tool for developers. So now it’s your turn, give it a try. You will be up and running fast.
You have anything to share? Please let us know by posting your comments below. Please don't forget to share this article with your friends. Thanks for reading.


