Introduction:
My last article was “How to build Facebook style profile photo upload using PHP + JQuery + Ajax Part1”. . This is continuation of my last article, last tutorial I show you how to upload profile picture using jquery, ajax, in this tutorial I will show you how to create thumbnail to fit the profile picture and saving into database.
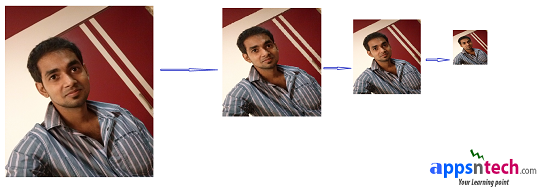
Profile Picture Upload and Thumbnail Creation:
To achieve this I am using Cygnite PHP framework, if you had built application already, would like to use tiny component rather than using entire framework, you can use standalone Cygnite File component for image uploading and creating thumbnail image.
In previous tutorial we already created controller, view and js files. Open apps/controllers/ProfileController.php, import namespace to include thumbnail component, and add below code after uploading the file upload success to generate thumbnail image. I am adding piece of code to upload, creating thumbnail image and saving into database below, you can update below code into our ProfileController.php uploadAction() as discussed in the part1 tutorial.
use Apps\Models\Profile;
use Cygnite\Common\File\Thumbnail\Image; // available in dev-master
use Apps\Components\Thumbnail\Image; //available in v1.2.4


$status = Upload::process(function($upload)
{
    $upload->file = 'document'; // Your file input element name
    $upload->ext = array("JPG", "PNG"); // Add validation for image upload
    //$upload->size = '6144';// limit the size

    if  (isset($_FILES['document']))  {

        $fileArray = array();
        $fileArray = pathinfo($_FILES['document']['name']);

        if ($upload->save(array("destination"=> "upload",  "fileName"=>$fileArray['filename'])) ) {

            // Create thumbnail object
            $thumb = new Image();
            $thumb->setRootDir(CYGNITE_BASE);
            $thumb->directory = 'upload/'.$_FILES['document']['name'];
            $thumb->fixedWidth = 100;
            $thumb->fixedHeight = 100;
            $thumb->thumbPath = 'upload/thumbnail/';
            $thumb->thumbName = $fileArray['filename'];

            if ( $thumb->resize() ) {

                // Save profile information into database
                 $profile = new Profile();
                 $profile->name = 'Sanjoy Dey';
                 $profile->original_image_path = CYGNITE_BASE.'upload/';
                 $profile->image = $_FILES['document']['name'];
                 $profile->thumbnail_image_path = CYGNITE_BASE.'upload/thumbnail/';
                 $profile->save();
            }

            $response= array('status' => true, 'msg' => 'Profile Picture Uploaded Successfully!' );
        } else {
            $response = array('status' => false, 'msg' => implode(', \n', $upload->getError()) );
        }
        header('Content-type: application/json');
        return  json_encode($response);
    }
});

echo $status ;
We are storing the thumbnail image into /cygnite/upload/thumbnail/ directory and saving into table 'profile'.
We will save the thumbnail image path and original image path into database as above. let me assume you have already set database connection into apps/configs/database.php
If you are building session based application. You can simply check user session id to identify user profile image and display it.
Using Standalone Cygnite File Thumbnail Component for creating thumbnail image:
If you are using standalone file thumbnail component to create thumbnail image (Discussed in previous post) than install file component from composer repository and below code to resize.
 require 'vendor/autoload.php';

 use Cygnite\Common\File\Thumbnail\Image;


 $thumb = new Image();
 $thumb->setRootDir(getcwd());
 $thumb->directory = getcwd().'/upload/profile-picture.jpg';// your dynamic image path
 $thumb->fixedWidth = 100;
 $thumb->fixedHeight = 100;
 $thumb->thumbPath = 'upload/thumbnail/';
 $thumb->thumbName = 'profile_thumbnail_image';

 if ( $thumb->resize() ) {
    // success
 }
Conclusion:
Hope you found this article helpful. If you are interested to write tutorial for us please post me. Please don’t forget to like, share with friends, or leave your comments below.
Keep visiting for upcoming article. Have a nice day.


